Photographing the Skywalk and the fjord
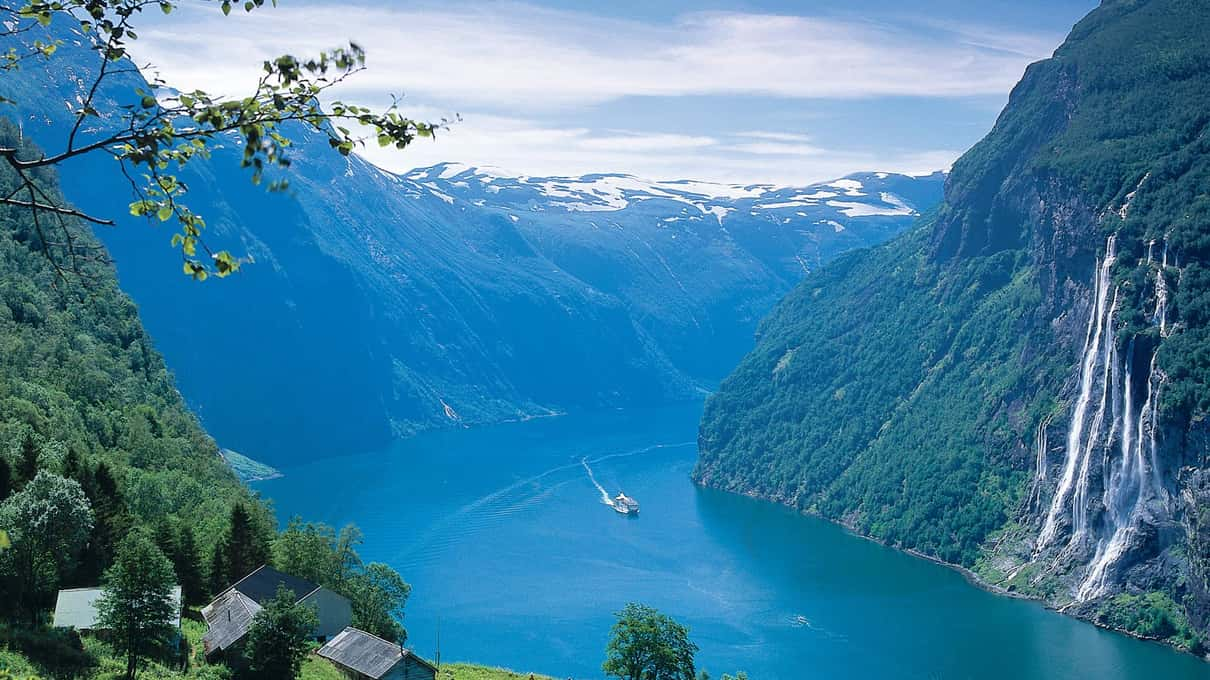
From the Skywalk the Geirangerfjord shrinks to a thin ribbon of water far below, with the village a scatter of roofs at its head. On a clear day a phone gets that picture with little effort, and on a cloudy one the fog becomes the picture. Tours stop for around 20 to 30 minutes at each viewpoint, so a plan beats extra gear.
How long each tour stops
Time is the scarcest thing on a photo stop, so look at it before you think about lenses. The listings and reviews give a rough picture.
| Tour | Length | Viewpoints | Time to shoot | From |
|---|---|---|---|---|
| Excursions.no, our pick | 3.5 h | Flydalsjuvet, Skywalk, Djupvatnet, Eagle Bend | About 20 min a stop, per one review | ~$115 |
| VisitGeiranger panorama bus | 2 h or 1.5 h | Flydalsjuvet plus the Skywalk or Eagle Bend | Two photo stops in under 2 h | ~$71 (1.5 h version) |
| Your Shore Time, small group | 3 h | Flydalsjuvet, Skywalk, Djupvatnet, Eagle Road | About 30 min at Flydalsjuvet | ~$122 |
| Calm Giant Tour, private | 5 h | Dalsnibba, Flydalsjuvet, Djupvatnet walk, Eagle Road, waterfall hike | Private group, so ask the guide | ~$1,882 per group |
The most common gripe in reviews of our pick is wanting a little more time at each stop. Decide before the bus parks which one or two shots you want, take them first, then spend whatever is left looking with your own eyes. Which tour to choose compares the four on more than photo time.
Shooting from the Skywalk platform
The platform has a glass railing, and glass in front of a lens adds reflections and rain spots. Either hold the phone above the top edge or press the lens flat against the glass, which cuts most reflections. Use a wrist strap or a firm grip whenever you reach out, because a phone that slips is gone for good, several hundred meters down.
A wide lens suits the view. The 0.5x setting on most phones, or about 16–24 mm on a camera, fits the whole valley into one frame with the fjord included. Keep the horizon level, because a big drop fools the eye and a ridge line tilted by a few degrees makes the picture feel wrong. A friend standing at the railing gives the scene a sense of scale.
For the fjord as a thin ribbon, switch to 2x or 3x and frame it alone. Shot that way the water reads as a narrow strip between dark walls, and a cruise ship at anchor turns into a white speck, which says more about scale than any wide view.
Light through the day
From Dalsnibba you look roughly north down the valley toward Geiranger, so around midday the sun sits more or less behind you and lights the valley evenly. That gives clear, bright pictures, if rather flat ones. Earlier and later, side light picks out the ridges and the edges of snowfields, and the shadows give the valley depth. Cruise tours run to the ship's timetable, so most passengers take whatever light the schedule offers. Travelers with a car can choose their hour more freely within the shop and café hours.
The season shifts the colors too. Early on, white snow walls along the road and an iced-over Djupvatnet give strong contrast, while July and August bring green slopes and less ice on the lake. The season guide sets out the months.
Fog as the subject
Dalsnibba spends a lot of time in cloud, and it pays to shoot the cloud rather than wait it out. On the good days you stand above a sea of cloud with peaks poking through, one of the most striking scenes the mountain offers. Phones often blow bright cloud out into a flat white blob, so tap on the cloud and slide the exposure down a little until its texture comes back. Fog drifting through the valley below, layered between ridges, can be beautiful too.
When the top sits inside the cloud, look closer instead of farther. Figures on the platform turn into soft silhouettes, and the railing fades into white a few meters out. Lower stops may lie below the cloud base. Snow and ice have stopped some of our pick's autumn groups short of the summit, so they photographed lakes and Eagle Bend instead, while another made it up after the road reopened and saw only snow and fog. Our weather guide covers webcams and what tours do when the road shuts.
Four viewpoints on one ticket, from ~$115
Excursions.no adds Flydalsjuvet and Eagle Bend to the Skywalk, plus a stop by Djupvatnet, with a live guide in English. It is the most reviewed tour on our site, at 4.6 from 2,909 reviews.
Flydalsjuvet and the Queen's Chair
Flydalsjuvet, a gorge viewpoint above Geiranger, is one of the most photographed views in Norway, and the shot everyone wants is taken from the Queen's Chair on the lower platform. Expect a queue when several buses arrive together. If the chair matters to you, head down while the rest of the group is still at the upper railing, and team up with another passenger to take each other's pictures. If it does not, the upper platform gives the wider view and you skip the line.
For the chair shot itself, stand behind the sitter so the valley fills the frame beyond them, and try a vertical frame as well as a horizontal one. Your Shore Time's small-group tour from ~$122 allows about 30 minutes at Flydalsjuvet, the longest stop we have seen in the listings, and our viewpoint guide describes each stop on the road.
Eagle Bend and the Seven Sisters
Eagle Bend, Ørnesvingen in Norwegian, sits near the top of the Eagle Road, the road north out of Geiranger with its 11 hairpins. From the viewpoint you look back over the village and along the fjord toward the Seven Sisters waterfall. The falls are thin strands at that distance, so zoom to 2x or 3x for a frame of the waterfall alone, and use the wide lens for the hairpins and rooftops below. In early summer, with the snowmelt, the falls usually carry the most water.
A branch or a fellow traveler in the foreground gives the fjord depth. VisitGeiranger's 1.5-hour panorama bus from ~$71 includes Eagle Bend, as does our pick.
From the bus window
Some of the most dramatic angles come between stops, when the coach swings around a hairpin and the valley opens up. Which side of the bus gets the view changes with the road, so ask your guide or driver where to sit before you board rather than guessing. Turn off the flash. Hold the lens close to the window to cut reflections, and use burst mode, since each view lasts only a second or two.
If hairpins make you queasy, staring at a screen on the bends makes it worse. Put the phone down and look at the horizon, and see our guide to heights and motion sickness for more.
Phone settings and the drone question
- Wipe the lens. Fog and drizzle leave a film that softens every picture. A soft cloth in a pocket fixes it;
- Turn on grid lines. They keep the horizon straight when the drop below throws off your sense of level;
- Lock exposure on bright scenes. Press and hold on the brightest part of the frame, then lower the exposure slightly so snow and cloud keep their texture;
- Pan slowly for panoramas. Keep the phone upright and move steadily. Wind and people walking through spoil many attempts, so take two;
- Keep the battery warm. Cold drains phone batteries fast. Carry the phone in an inside pocket between shots, along with the rest of our advice on what to wear.
Drones are a different matter. Rules for flying them change and vary from place to place, so check the current local drone rules before you fly anywhere around Geiranger. On a cruise excursion the question rarely comes up, since a 20-minute stop leaves no time to get a drone into the air and packed away again before the bus moves on.